获取 token
在本地 Windows 电脑上下载 rclone,点这里下载,然后解压出来,比如我把它解压到C盘根目录下的rclone文件夹内,那么后续操作就是,打开Windows powershell执行以下命令:
cd C:\rclone
.\rclone.exe authorize “onedrive”
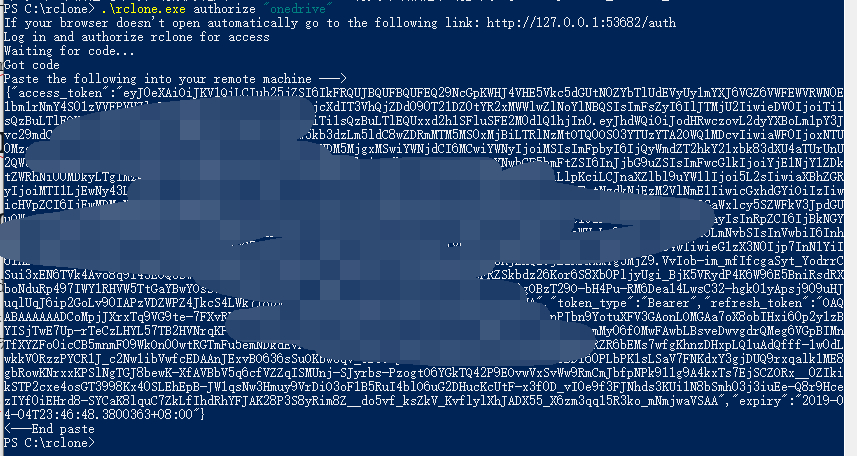
会打开一个网页,在网页上登录你的账号,回到 Windows powershell,会出来你所需要的token。如下图

{“access_token”:”xxxxxxxx”} # 注意!复制{xxxxxxxx}整个花括号内容,并保存好,后面需要用到。
安装 Rclone
官方提供了一键安装脚本,服务器上执行:
curl https://rclone.org/install.sh | bash
安装完毕以后继续
配置 Rclone
执行:
rclone config
会出来一系列配置过程,网上的很多教程已经比较旧了,我把昨晚配置的过程贴一下。大同小异。
n) New remote
s) Set configuration password
q) Quit config
n/s/q> n 这里选n就是新建的意思
name> E3 # 输入名称,我这里挂载的是E3订阅的,所以取名叫E3,你们那边随意。
Type of storage to configure.
Enter a string value. Press Enter for the default (“”).
Choose a number from below, or type in your own value
1 / A stackable unification remote, which can appear to merge the contents of several remotes
\ “union”
2 / Alias for a existing remote
\ “alias”
3 / Amazon Drive
\ “amazon cloud drive”
4 / Amazon S3 Compliant Storage Providers (AWS, Ceph, Dreamhost, IBM COS, Minio)
\ “s3”
5 / Backblaze B2
\ “b2”
6 / Box
\ “box”
7 / Cache a remote
\ “cache”
8 / Dropbox
\ “dropbox”
9 / Encrypt/Decrypt a remote
\ “crypt”
10 / FTP Connection
\ “ftp”
11 / Google Cloud Storage (this is not Google Drive)
\ “google cloud storage”
12 / Google Drive
\ “drive”
13 / Hubic
\ “hubic”
14 / JottaCloud
\ “jottacloud”
15 / Local Disk
\ “local”
16 / Mega
\ “mega”
17 / Microsoft Azure Blob Storage
\ “azureblob”
18 / Microsoft OneDrive
\ “onedrive”
19 / OpenDrive
\ “opendrive”
20 / Openstack Swift (Rackspace Cloud Files, Memset Memstore, OVH)
\ “swift”
21 / Pcloud
\ “pcloud”
22 / QingCloud Object Storage
\ “qingstor”
23 / SSH/SFTP Connection
\ “sftp”
24 / Webdav
\ “webdav”
25 / Yandex Disk
\ “yandex”
26 / http Connection
\ “http”
Storage> 18 # 选择18,Microsoft OneDrive
** See help for onedrive backend at: https://rclone.org/onedrive/ **
Microsoft App Client Id
Leave blank normally.
Enter a string value. Press Enter for the default (“”).
client_id> # 留空,回车
Microsoft App Client Secret
Leave blank normally.
Enter a string value. Press Enter for the default (“”).
client_secret> # 留空,回车
Edit advanced config? (y/n)
y) Yes
n) No
y/n> n # 选n
Remote config
Use auto config?
Say Y if not sure
Say N if you are working on a remote or headless machine
y) Yes
n) No
y/n> n # 选n
For this to work, you will need rclone available on a machine that has a web browser available.
Execute the following on your machine:
rclone authorize “onedrive”
Then paste the result below:
result> {“XXXXXXXX”} # 上面保存的token复制到这里
2018/10/31 19:54:06 ERROR : Failed to save new token in config file: section ‘E3’ not found
Choose a number from below, or type in an existing value
1 / OneDrive Personal or Business
\ “onedrive”
2 / Root Sharepoint site
\ “sharepoint”
3 / Type in driveID
\ “driveid”
4 / Type in SiteID
\ “siteid”
5 / Search a Sharepoint site
\ “search”
Your choice> 1 # 这里问你要选择的类型,选1
Found 1 drives, please select the one you want to use:
0: OneDrive (business)
Chose drive to use:> 0 # 程序找到网盘,这里编号是0,就选择0
Found drive ‘root’ of type ‘business’, URL: https://xxxxxx-my.sharepoint.com/personal/xxxxxxx/Documents
Is that okay?
y) Yes
n) No
y/n> y # 选y
[E3]
type = onedrive
token = {“XXXXXXXX”}
drive_id = XXXXXXXXX
drive_type = business
y) Yes this is OK
e) Edit this remote
d) Delete this remote
y/e/d> y # 选y
Current remotes:
Name Type
==== ====
E3 onedrive
e) Edit existing remote
n) New remote
d) Delete remote
r) Rename remote
c) Copy remote
s) Set configuration password
q) Quit config
e/n/d/r/c/s/q> q # 选q,退出
这样就是 Rclone 就已经成功连接到 OneDrive了。
安装 fuse
debian系统:
|
1
|
apt–get update && apt–get install –y fuse
|
centos系统:
|
1
|
yum install –y fuse
|
挂载:
#挂载
rclone mount <网盘名称:网盘路径> <本地路径> [参数] –daemon
#取消挂载
fusermount -qzu <本地路径>
网盘名称 为配置时填的name,网盘路径 为网盘里的文件夹,留空为整个网盘,本地路径 为服务器上的本地文件夹。参数可以查看官方文档根据需求进行选择。实际输入时不要有括号,这里只是为了更清楚的区分。–daemon 为进程守护参数,可后台运行。例如我的挂载命令:
|
1
|
rclone mount E3:/ /root/oneDrive —copy–links —allow–other —allow–non–empty —umask 000 —daemon
|
E3:/这个就是之前配置的时候的name,:/就是说整个网盘挂载过来,你也可以具体挂载网盘里面的某个目录,比如可以写 E3:PT,这样就是把onedrive里面的PT这个文件夹挂载过来。
/root/oneDrive这就是本地的文件夹。需要自己先建立好目录。
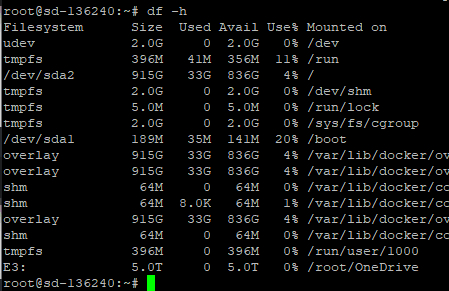
然后 用df -h命令看一下:

看到最后一行E3 5.0T就是挂载上了。
设置为自启动
下载脚本
wget -N https://raw.githubusercontent.com/P3TERX/script/master/rcloned && nano rcloned
修改配置文件
NAME=”Onedrive” #Rclone配置时填写的name
REMOTE=” #远程文件夹,网盘里的挂载的一个文件夹,留空为整个网盘
LOCAL=’/Onedrive’ #挂载地址,VPS本地挂载目录
设置开机启动
mv rcloned /etc/init.d/rcloned
chmod +x /etc/init.d/rcloned
update-rc.d -f rcloned defaults
bash /etc/init.d/rcloned start
看到 rclone 启动成功 ! 即可。
管理
开始挂载 bash /etc/init.d/rcloned start
停止挂载 bash /etc/init.d/rcloned stop
重新挂载 bash /etc/init.d/rcloned restart
查看日志 tail -f /$HOME/.rclone/rcloned.log
同步文件
rclone copy命令可以往网盘里传文件。
rclone copy 本地文件 远程文件夹,例如:
|
1
|
rclone copy 1.mp4 E3:PT/test –v
|
这样就是把本地的1.mp4同步到onedrive里面的/PT/test这个文件夹里面,远程没有文件夹会自动创建的。-v会显示速度。其他就自己百度吧
文章来源:http://www.xxhjkl.me/?p=481
文章参考:
https://p3terx.com/archives/rclone-installation-and-configuration-tutorial.html
https://p3terx.com/archives/linux-vps-uses-rclone-to-mount-network-drives-such-as-onedrive-and-google-drive.html


